Brainwasher5 (talk | contribs) No edit summary |
|||
| Line 1: | Line 1: | ||
[[Image:Act2Q2.gif|thumb|right|Quest icon]] |
[[Image:Act2Q2.gif|thumb|right|Quest icon]] |
||
| − | The quest for the '''Horadric Staff''' starts |
+ | The quest for the '''Horadric Staff''' starts with the player bringing the Horadric Scroll that was found in the {{a|II|Sewers}}, to [[Deckard Cain]]. '''The Horadric Staff''' is the second quest of [[Act II]] and is one of the longest of [[Diablo II|the game]]. |
==Quest information== |
==Quest information== |
||
[[Image:HoradricScroll.gif|right]] |
[[Image:HoradricScroll.gif|right]] |
||
| − | Cain will tell |
+ | Cain will tell about the Horadric mages of old, who crafted fierce staves and imbued them with the power to unlock [[Tal Rasha]]'s burial chamber. However, after nearly losing such a staff to a thief rogue sorcerer, the Horadrim decided to sever the staves into two parts and scatter the pieces so they could be safeguarded, and to prevent the key to Tal Rasha's Tomb from falling into the wrong hands. The quest involves finding [[Tal Rasha's Tomb]], where [[Baal]] lies imprisoned. The player sets out on a search for the two pieces that comprise the {{i|Horadric Staff}}: the shaft and the headpiece, as well as an ancient artifact, the [[Horadric Cube]], that can transmute the pieces into a Horadric Staff. |
===The Horadric Cube=== |
===The Horadric Cube=== |
||
[[Image:Horadric-cube.gif|right]] |
[[Image:Horadric-cube.gif|right]] |
||
| − | This artifact is hidden deep within the [[Halls of the Dead]] in the [[Dry Hills]]. There is a [[waypoint]] hidden on level 2. Be prepared to battle your way through legions of [[Undead]] and many other |
+ | This artifact is hidden deep within the [[Halls of the Dead]] in the [[Dry Hills]]. There is a [[waypoint]] hidden on level 2. Be prepared to battle your way through legions of [[Undead]] and many other enemies. The Cube is located in a gold chest on level 3 that is guarded by [[Bloodwitch the Wild]]. After obtaining the Cube, the player must return to town and speak with [[Deckard Cain]]. He will explain the qualities of the cube, as well as other useful information about it. The most important of which is the fact that the cube can be used to transmute items into other items. (For a list of these "recipes," see the [[Horadric Cube]] article.) |
===The Staff of Kings=== |
===The Staff of Kings=== |
||
[[Image:StaffofKings.gif|right]] |
[[Image:StaffofKings.gif|right]] |
||
| − | After obtaining the Horadric Cube, |
+ | After obtaining the Horadric Cube, the player must travel to the [[Far Oasis]] adjacent to the Dry Hills. Here, he/she must find the [[Maggot Lair]]. The entrance looks like a tunnel dug into the sand dunes. It is the dwelling place of a plethora of insect-like enemies, such as the [[Sand Maggot]], [[Scarab Demon]] and [[Swarm]]. At the bottom of the [[Maggot Lair]] lies the [[Super Unique]] [[Sand Maggot]] matriarch, [[Coldworm The Burrower]]. This boss has the ability to spawn full grown [[Sand Maggot]] monsters, but the chief danger here is the intense poison damage coupled with the frost nova Coldworm unleashes out upon death. After her defeat, open the gold chest in the room. In it, the player will find the Horadric Shaft, which [[Deckard Cain]] will identify as the [[Staff of Kings]], the shaft portion of the {{i|Horadric Staff}}. |
===Amulet of the Viper=== |
===Amulet of the Viper=== |
||
[[Image:Amuletoftheviper.gif| right]] |
[[Image:Amuletoftheviper.gif| right]] |
||
| − | Now it is time to get the headpiece and complete the Horadric Staff. |
+ | Now it is time to get the headpiece and complete the Horadric Staff. Travel to the Lost City, located off the [[Far Oasis]], and a sudden eclipse will darken the sky; the quest notification [[Image:Notification.jpg]] pops up. This triggers the [[Tainted Sun]] quest, and both quests conveniently have the same destination, the [[Claw Viper Temple]]. The Temple is hidden within the [[Valley of Snakes]], adjacent to the [[Lost City]], and is filled with demonic [[Claw Viper]] and [[Salamander]] monsters. At the second level, more Claw Vipers and a [[Super Unique]], lightning enchanted monster called [[Fangskin]] awaits the player. Defeat the monsters and break the [[Tainted Sun]] Altar. Not only does this complete the Tainted Sun quest, but it also yields the [[Amulet of the Viper]], the missing headpiece of the {{i|Horadric Staff}}. |
[[Image:Horadricstaff.gif|right]] |
[[Image:Horadricstaff.gif|right]] |
||
| − | + | With all the pieces gathered, recombining the Horadric Staff is possible. Place the [[Staff of Kings]] and the [[Amulet of the Viper]] inside the [[Horadric Cube]] and transmute them to create the Horadric Staff. |
|
===Completing the Quest=== |
===Completing the Quest=== |
||
| − | + | Upon locating the [[Canyon of the Magi]] and the Tomb of [[Tal Rasha]], the player must search for a magical orifice hidden deep within the tomb. The orifice is located in a chamber with symbols of the Seven Tombs on the floor. Place the Horadric Staff within the orifice and behold as the entrance to Tal Rasha's burial chamber is revealed, completing this convoluted quest. Be prepared for a fight against the [[Duriel]]. |
|
[[Image:Orifice.JPG]] |
[[Image:Orifice.JPG]] |
||
Revision as of 23:10, 5 December 2010

Quest icon
The quest for the Horadric Staff starts with the player bringing the Horadric Scroll that was found in the Sewers, to Deckard Cain. The Horadric Staff is the second quest of Act II and is one of the longest of the game.
Quest information

Cain will tell about the Horadric mages of old, who crafted fierce staves and imbued them with the power to unlock Tal Rasha's burial chamber. However, after nearly losing such a staff to a thief rogue sorcerer, the Horadrim decided to sever the staves into two parts and scatter the pieces so they could be safeguarded, and to prevent the key to Tal Rasha's Tomb from falling into the wrong hands. The quest involves finding Tal Rasha's Tomb, where Baal lies imprisoned. The player sets out on a search for the two pieces that comprise the Horadric Staff: the shaft and the headpiece, as well as an ancient artifact, the Horadric Cube, that can transmute the pieces into a Horadric Staff.
The Horadric Cube
This artifact is hidden deep within the Halls of the Dead in the Dry Hills. There is a waypoint hidden on level 2. Be prepared to battle your way through legions of Undead and many other enemies. The Cube is located in a gold chest on level 3 that is guarded by Bloodwitch the Wild. After obtaining the Cube, the player must return to town and speak with Deckard Cain. He will explain the qualities of the cube, as well as other useful information about it. The most important of which is the fact that the cube can be used to transmute items into other items. (For a list of these "recipes," see the Horadric Cube article.)
The Staff of Kings
After obtaining the Horadric Cube, the player must travel to the Far Oasis adjacent to the Dry Hills. Here, he/she must find the Maggot Lair. The entrance looks like a tunnel dug into the sand dunes. It is the dwelling place of a plethora of insect-like enemies, such as the Sand Maggot, Scarab Demon and Swarm. At the bottom of the Maggot Lair lies the Super Unique Sand Maggot matriarch, Coldworm The Burrower. This boss has the ability to spawn full grown Sand Maggot monsters, but the chief danger here is the intense poison damage coupled with the frost nova Coldworm unleashes out upon death. After her defeat, open the gold chest in the room. In it, the player will find the Horadric Shaft, which Deckard Cain will identify as the Staff of Kings, the shaft portion of the Horadric Staff.
Amulet of the Viper
Now it is time to get the headpiece and complete the Horadric Staff. Travel to the Lost City, located off the Far Oasis, and a sudden eclipse will darken the sky; the quest notification ![]() pops up. This triggers the Tainted Sun quest, and both quests conveniently have the same destination, the Claw Viper Temple. The Temple is hidden within the Valley of Snakes, adjacent to the Lost City, and is filled with demonic Claw Viper and Salamander monsters. At the second level, more Claw Vipers and a Super Unique, lightning enchanted monster called Fangskin awaits the player. Defeat the monsters and break the Tainted Sun Altar. Not only does this complete the Tainted Sun quest, but it also yields the Amulet of the Viper, the missing headpiece of the Horadric Staff.
pops up. This triggers the Tainted Sun quest, and both quests conveniently have the same destination, the Claw Viper Temple. The Temple is hidden within the Valley of Snakes, adjacent to the Lost City, and is filled with demonic Claw Viper and Salamander monsters. At the second level, more Claw Vipers and a Super Unique, lightning enchanted monster called Fangskin awaits the player. Defeat the monsters and break the Tainted Sun Altar. Not only does this complete the Tainted Sun quest, but it also yields the Amulet of the Viper, the missing headpiece of the Horadric Staff.
With all the pieces gathered, recombining the Horadric Staff is possible. Place the Staff of Kings and the Amulet of the Viper inside the Horadric Cube and transmute them to create the Horadric Staff.
Completing the Quest
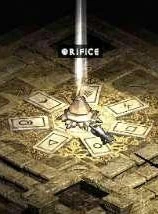
Upon locating the Canyon of the Magi and the Tomb of Tal Rasha, the player must search for a magical orifice hidden deep within the tomb. The orifice is located in a chamber with symbols of the Seven Tombs on the floor. Place the Horadric Staff within the orifice and behold as the entrance to Tal Rasha's burial chamber is revealed, completing this convoluted quest. Be prepared for a fight against the Duriel.
| Diablo II and Lord of Destruction quests |
|---|
|
Act I — Den of Evil • Sisters' Burial Grounds •
Search for Cain • The Forgotten Tower • Tools of the Trade • Sisters to the Slaughter |
| Act V — Siege on Harrogath • Rescue on Mount Arreat • Prison of Ice • Betrayal of Harrogath • Rite of Passage • Eve of Destruction |